
Something Not Right?
From time to time, you may have to refresh your browser to purge it of any old content and reload content from our servers. This is most recommended after we’ve made changes to the system. If you ever feel that something just doesn’t seem right, or you aren’t getting the results you are used to, it’s best to Log Out of Maestro (click your name in the top right corner and select Log Out, press fn+F5 on your keyboard (Command+R if you’re on a MAC), then log back into Maestro.
Also necessary at times, is the need to clear your browser history. To do so depends on your browser, so doing a quick search “how to clear browser history” should bring up the instructions you need.

New! - Lab Report Integration
Exclusively for subscribers of Maestro Complete Plus, click here for instructions on activating your lab report integration into Maestro. Available integrations include Evexia Diagnostics, Professional Co-op Services, and Maestro’s Intelligent PDF Importer.
Evaluating a Patient - Choose Your Method
My Patient Will Complete the Survey on Paper
- You will provide your patient with a PDF copy of the Systems Survey, either from Maestro or via external means.
- Your patient will complete the Systems Survey using pen or pencil, and return it to you.
- You (the Practitioner), or someone on your Staff, will transponse the Patient’s Systems Survey responses manually into Maestro.
My Patient Will Complete the Survey Online
- You must be subscribed to a “Plus” level subscription which includes the Patient Portal and allows your patients to complete Sytems Surveys electronically.
- You will Invite your Patient to the Portal so they can create their own unique password
- Patient will complete the Systems Survey online
- You (the Practitioner) will receive an email when the Patient completes the Systems Survey.
This scenario is for those evaluating their Patient with Blood Chemistry, Muscle Testing, HSR, or just want to create an ad-hoc custom patient schedule
- Create an evaluation in Maestro for the Patient.
- Bypass the Survey tab by either going directly to the Blood Chemistry tab or the Results tab.
Blood Chemistry, Muscle Testing, Heart Sound Recorder, Custom Patient Schedules
Evaluation Flow

Patient Statuses Explained

What Screen Are You On?
Main Screens
Home Screen
Patients List
Patient Details Screen
Setup Screen
Evaluation Screens
Survey
Blood Chemistry
Results - Patient Consultation
Reports
Invoices
Options for Evaluating Your Patient
Paper Survey - Manually Enter Survey into Maestro
If your patient has already been added to the system, move on to the next step. If not, then you’ll want to add your patient to begin (See: Adding a New Patient). You cannot complete an evaluation without having a patient created.
You must have an evaluation created in order to evaluate your patient. (See: Add a New Evaluation) Once an evaluation is created, your patient will have a status of In Progress, and under the column Next Eval, you will see the date of the evaluation. Clicking on this date will take you to the next step, inputting the survey data.
From the Survey tab, you can now begin inputting the survey data provided by your patient. You can do this by clicking 1 – 2 – 3 for each question in group 1, then continuing in this manner through each of the groups. Alternatively, you can utilize Quick Entry 1 or Quick Entry 2.
Quick Entry 1 allows you to input the question number, then the question answer and press Enter. Do this for each answered question on the survey.
Quick Entry 2 is the best option. It allows you to quickly answer all of the 1 responses, then all of the 2 response and so forth. Simply preselect the response value (1, 2, 3), then enter the first question number with the preselected response value and press enter. Continue this for each question answered with the preselected response value. You do not need to reset the preselected response value until you have finished entering all the questions answered for that response value. Once complete, change the preselect value and repeat.
Once all responses are entered, move to the results tab.
When you move from the Survey tab to the Results tab, the program assesses the survey responses and makes supplement recommendations for you based on: 1) the default calculation method set in the Setup screens and 2) the maximum number of supplements to recommend, again based on defaults set in the Setup screens.
The results screen is where you will be consulting with your patient. (See: Understanding the Results Screen) Things to consider during the report of findings are:
- Is the recommended protocol good for my patient? Be sure to utilize the Cal Method dropdown to show the protocol based on different supplement vendors.
- Is it beneficial to add additional recommended supplements to the protocol or remove supplements? Unless you’ve changed the default settings, the system will generate a protocol showing the 8 most important supplements based on the survey responses, listed from most important (top) to less important (bottom). The top 4 supplements will automatically be checked. It is advised that if you need to remove supplements from this recommended protocol, you do so from the bottom up (unchecking the bottom-most checked supplement, then up and so forth). If you need to add more, do so from the bottom down (checking the top-most unchecked supplement, then downward and so forth).
- Do I need to add other supplements that were not part of the generate recommendation?
- Do I need to add protocols? For example, the survey doesn’t specifically address acne, but if your patient has acne, it might be good to add the acne protocol from the clinical reference guide.
- Is my patient ok with the days supply, which essentially is the length of the protocol but also is used in our bottle optimizer to make sure your patient gets the correct amount of product to cover the length of protocol.
- Is my patient ok with the cost of the protocol? Be sure to utilize the Show Price As to automatically adjust the pricing to take into consideration higher Drop Ship costs, etc.
- Have I reviewed all the cautions and contraindications associated to the supplements?
- Have I checked the Notes for Practitioner? Here you will see important notes such as “You’ve selected a non-gluten free supplement but your patient is gluten free.”
- Do I need to add Notes for Patient? These notes will show on the patient reports and can be anything you want the patient to remember, such as only take supplement A for two weeks, then stop for a week, then repeat. Or maybe, please exercise regularly in conjunction with your new protocol and stay away from processed foods.
- Do I need to add Evaluation Notes? These notes are for you, the practitioner, and will only show on the clinician reports (not for the patient).
Once everything has been approved with regard to the protocol, click Begin Protocol in the top right. This begins the protocol, based on the days supply, and the status for your patient will change to In Protocol.
On the reports tab, you can view, print, or download any of the available reports. Reports contain quite a bit of information, so to get more familiar with each of them, it’s best to review the reports as you complete evaluations.
It is not recommended to send any of the Clinician Report or the Clinician Warnings to a Patient.
You can create invoices at any time during the evaluation, however, we recommend that you wait until you’ve clicked the Begin Protocol button and the patient is in an In Protocol status. You can create as many different invoices as you wish, and each will be saved for future viewing, printing, emailing, etc.
Why would you need more than one invoice?
Let’s say you don’t maintain any product inventory or you only maintain only some basic items. Looking at the 4 supplements on your patients protocol, you see that you have one on your shelf and the other three you will be drop shipping to the patient. You’d then create an SLP invoice for the one product you have on your shelf, visit fees and for any non-supplement products you are selling. Then you’d use the Show Price As dropdown, change to DropShip, and create a dropship invoice for the three supplements you don’t have.
Online Survey - Patient Completes Survey in the Patient Portal
This process only applies if you are subscribed to a “Plus” service with includes the Patient Portal. This process allows your patients to complete the survey online, in the Patient Portal.
In order for your patients to complete the survey online, you MUST invite them to the Patient Portal and they MUST accept the invitation and create a password.
There are a few different ways to Invite your patient to the Patient Portal.
- Patients can be invited to the Patient Portal at the same time you are Adding the patient to Maestro (See: Adding a New Patient).
- On the Patient list, click the three dots under the Actions column for the desired patient, then click Invite Patient to Join Portal.
- Patients can be invited to the Patient Portal at the same time you are creating a new evaluation (See: Adding a New Evaluation).
Note: Patient must have an email address in the system and this email address will serve as their username. Patient will receive a invitation email which will direct them to create a password.
Please have your patients check SPAM or JUNK, and if necessary, redo these steps again to resend the invitation.
On the Patient list next to the name of the desired patient, you will see a shadow figure icon as shown.
If you do not see this icon, your patient has either not been invited to the Patient Portal OR they have not accepted the invitation and created their password.

If your patient has not accepted the portal invitation AND created their password, they are not yet registered on the portal. In these cases, your patient will not be able to complete the survey online.
If your patient has already been added to the system, move on to the next step. If not, then you’ll want to add your patient to begin (See: Adding a New Patient), paying special attention to the Invites tab on the Add Patient Popup as that is where you can invite them to the Patient Portal so they can complete surveys online. You cannot complete an evaluation without having a patient created and a patient cannot complete an evaluation without accepting the portal invite. Patients that have accepted the portal invitation will have the image below next to next to their names on the patient list.
You must have an evaluation created in order to evaluate your patient (See: Add a New Evaluation). When adding the evaluation, the system will alert you if your patient is not registered on the Patient Portal and will allow you to invite them so they can complete the survey online. Once an evaluation is created, your patient will have a status of In Progress or Survey Sent, and under the column Next Eval, you will see the date of the evaluation. The process of adding an evaluation includes sending an email to the patient instructing them to access the patient portal and complete the survey. You do not have to do anything further at this point until the patient completes the survey in the portal.
When your patient completes the survey online, their status will change to Needs Review. This is an indication for you to go into that patients evaluation and review the survey submission. Since you don’t really know what is or is not affecting your patient, the review of the survey is simply to check for completeness. Once reviewed, click the Approve Survey in the top left corner. If you see Approve w/o Submission in the top left corner as opposed to Approve Survey, this simply means that your patient has answered questions on the survey but did not click Submit in the patient portal. This could be because they were not finished with the survey or simply failed to hit the button. It is good practice to reach out to your patient to make sure. If they just failed to hit the button and you are certain that everything looks good with the survey, you can click Approve w/o Submission. Approve Survey and Approve w/o Submission will take you to the next step, Reports of Finding (the Results tab).
When you move from the Survey tab to the Results tab, the program assesses the survey responses and makes supplement recommendations for you based on: 1) the default calculation method set in the Setup screens and 2) the maximum number of supplements to recommend, again based on defaults set in the Setup screens.
The results screen is where you will be consulting with your patient. (See: Understanding the Results Screen) Things to consider during the report of findings are:
- Is the recommended protocol good for my patient? Be sure to utilize the Calc Method dropdown to show the protocol based on different supplement vendors.
- Is it beneficial to add additional recommended supplements to the protocol or remove supplements? Unless you’ve changed the default settings, the system will generate a protocol showing the 8 most important supplements based on the survey responses, listed from most important (top) to less important (bottom). The top 4 supplements will automatically be checked. It is advised that if you need to remove supplements from this recommended protocol, you do so from the bottom up (unchecking the bottom-most checked supplement, then up and so forth). If you need to add more, do so from the bottom down (checking the top-most unchecked supplement, then downward and so forth).
- Do I need to add other supplements that were not part of the generate recommendation?
- Do I need to add protocols? For example, the survey doesn’t specifically address acne, but if your patient has acne, it might be good to add the acne protocol from the clinical reference guide.
- Is my patient ok with the days supply, which essentially is the length of the protocol but also is used in our bottle optimizer to make sure your patient gets the correct amount of product to cover the length of protocol.
- Is my patient ok with the cost of the protocol? Be sure to utilize the Show Price As to automatically adjust the pricing to take into consideration higher Drop Ship costs, etc.
- Have I reviewed all the cautions and contraindications associated to the supplements?
- Have I checked the Notes for Practitioner? Here you will see important notes such as “You’ve selected a non-gluten free supplement but your patient is gluten free.”
- Do I need to add Notes for Patient? These notes will show on the patient reports and can be anything you want the patient to remember, such as only take supplement A for two weeks, then stop for a week, then repeat. Or maybe, please exercise regularly in conjunction with your new protocol and stay away from processed foods.
- Do I need to add Evaluation Notes? These notes are for you, the practitioner, and will only show on the clinician reports (not for the patient).
Once everything has been approved with regard to the protocol, click Begin Protocol in the top right. This begins the protocol, based on the days supply, and the status for your patient will change to In Protocol.
On the reports tab, you can view, print, or download any of the available reports. Reports contain quite a bit of information, so to get more familiar with each of them, it’s best to review the reports as you complete evaluations.
It is not recommended to send any of the Clinician reports to a Patient.
You can create invoices at any time during the evaluation, however, we recommend that you wait until you’ve clicked the Begin Protocol button and the patient is in an In Protocol status. You can create as many different invoices as you wish, and each will be saved for future viewing, printing, emailing, etc.
Why would you need more than one invoice?
Let’s say you don’t maintain any product inventory or you only maintain only some basic items. Looking at the 4 supplements on your patients protocol, you see that you have one on your shelf and the other three you will be drop shipping to the patient. You’d then create an SLP invoice for the one product you have on your shelf, visit fees and for any non-supplement products you are selling. Then you’d use the Show Price As dropdown, change to DropShip, and create a dropship invoice for the three supplements you don’t have.
Non-Survey Evaluations - Blood Chemistry, HSR, NRT, Custom Schedules, etc.
If your patient has already been added to the system, move on to the next step. If not, then you’ll want to add your patient to begin (See: Adding a New Patient). You cannot complete an evaluation without having a patient created.
You must have an evaluation created in order to evaluate your patient. (See: Add a New Evaluation) Once an evaluation is created, your patient will have a status of In Progress, and under the column Next Eval, you will see the date of the evaluation. Clicking on this date will take you to the next step, inputting the survey data.
When you first enter an evaluation, you will be on the Survey Tab. But in this case since you are building a schedule and not utilizing the survey, just skipped the survey completely and select the Results tab. You will be presented with a blank results tab, unless you have default supplements setup in the system. Now you can begin building your custom supplement schedule.
The results screen is where you will be consulting with your patient. (See: Understanding the Results Screen) Things to consider during the report of findings are:
- Add Supplements using the + Supplement button.
- Add Protocols using the + Protocol button.
- Add a Previous Protocol using the + Previous Protocols button.
- Check the Days Supply. Day Supply is essentially the length of the protocol but also is used in our bottle optimizer to make sure your patient gets the correct amount of product to cover the length of protocol.
- Is my patient ok with the cost of the protocol? Be sure to utilize the Show Price As to automatically adjust the pricing to take into consideration higher Drop Ship costs, etc.
- Have I reviewed all the cautions and contraindications associated to the supplements?
- Have I checked the Notes for Practitioner? Here you will see important notes such as “You’ve selected a non-gluten free supplement but your patient is gluten free.”
- Do I need to add Notes for Patient? These notes will show on the patient reports and can be anything you want the patient to remember, such as only take supplement A for two weeks, then stop for a week, then repeat. Or maybe, please exercise regularly in conjunction with your new protocol and stay away from processed foods.
- Do I need to add Evaluation Notes? These notes are for you, the practitioner, and will only show on the clinician reports (not for the patient).
Once everything has been approved with regard to the protocol, click Begin Protocol in the top right. This begins the protocol, based on the days supply, and the status for your patient will change to In Protocol.
On the reports tab, you can view, print, or download any of the available reports. Reports contain quite a bit of information, so to get more familiar with each of them, it’s best to review the reports as you complete evaluations.
It is not recommended to send any of the Clinician Report or the Clinician Warnings to a Patient.
You can create invoices at any time during the evaluation, however, we recommend that you wait until you’ve clicked the Begin Protocol button and the patient is in an In Protocol status. You can create as many different invoices as you wish, and each will be saved for future viewing, printing, emailing, etc.
Why would you need more than one invoice?
Let’s say you don’t maintain any product inventory or you only maintain only some basic items. Looking at the 4 supplements on your patients protocol, you see that you have one on your shelf and the other three you will be drop shipping to the patient. You’d then create an SLP invoice for the one product you have on your shelf, visit fees and for any non-supplement products you are selling. Then you’d use the Show Price As dropdown, change to DropShip, and create a dropship invoice for the three supplements you don’t have.
Understanding the Main Screens
Home Screen

- Follow up reminders is a list of patients where follow up action needs to take place, such as patients that need a survey, protocols ending, etc. Clicking on a patient will take you to the the evaluation details screen. These reminders are limited based on the Settings for Follow up and Status Workflow.
- Recently viewed is a list of patients that you recently viewed, with the top patient being the most recently and so forth downward. This list is limited to 10 patients. Clicking on a patient will take you to the patient details screen.
- Patients Chart is viewable by week, by month or by year, and represents the number of patients that were added to Maestro during the given timeframe.
- Top 10 Supplements chart is viewable by week, by month or by year, and represents product across all in-protocol patients that were part of the patients protocols. Recommended product that was not part of the final protocol is not included here. Hovering the mouse over any of the wheels colored sections will display the specific number and name of that given product.
- You can create a patient from here on the home screen or from the patient list, in either place, by clicking the +Patient button (top right). See Adding a New Patient for details.
- The number displayed in the Protocols Ending widget represent the number of patients that are nearing the end of the protocols. It shows patients that are 10 from the end of their “days supply” through to 10 days after their “days supply.” This end date is user-defined in settings under In Protocol Status. Clicking on the Protocols Ending widget will take you to the Protocols Ending Patient List.
- The Leads widget is only viewable if you are subscribed to a service that includes the Patient Portal and have chosen the Patient Generator add-on service. The number that is displayed here, represents the number of patients that have been generated by the Patient Generator QR code or link. Clicking on the leads widget will take you to the Leads Patient List.
Patients List
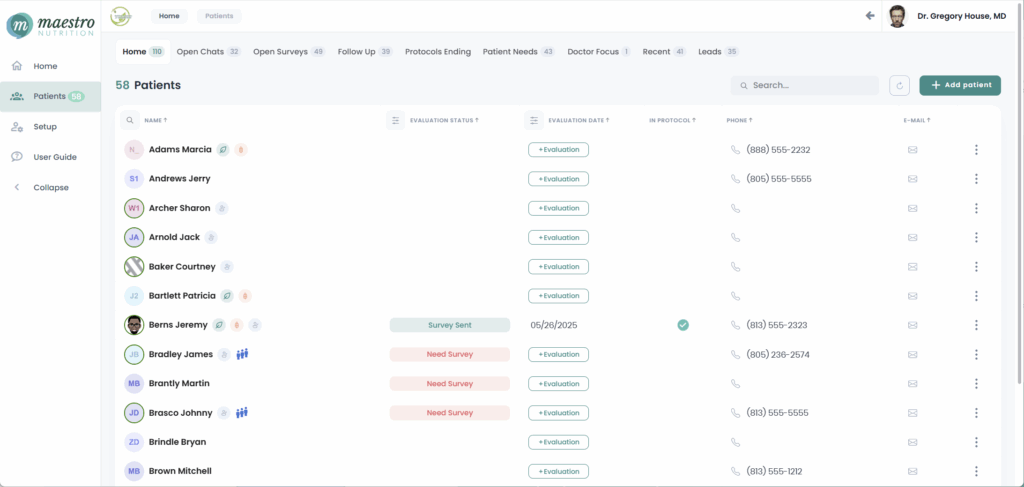
You can create a patient from the home screen or from the patient list, in either place by clicking the +Patient button (top right).
The only required information for adding a patient is First and Last Name, Assigned Practitioner, and Gender. Gluten free or vegetarian should also be considered based on your patient, as well as email address if you intend to email the patient directly from the system.
Beyond that, however, street address, email address and phone number are all components of the generated receipts, so entering this information is recommended if for no other reason than cosmetics.
Supplement Sales Tax % – This setting will affect only the selected patient and will override any supplement sales tax set in the global settings. This setting applies sales tax to all supplement products.
Non-Supplement Sales Tax % – This setting will affect only the selected patient and will override any non-supplement sales tax set in the global settings. This setting applies sales tax to all non-supplement products.
Supplement Discount/Increase % – This setting will affect only the selected patient and will override any Supplement Discount/Increase % set in the global settings. This setting applies a percentage increase or percentage decrease to all supplement products. Does not affect shipping or supplements that are not on a Standard List Price receipt.
On the last tab, you can also add an evaluation and/or invite the patient to the portal, at the same time you are creating the patient. If you skip this part, you can always add an evaluation or invite to the portal at a later time.
On the patient list, click Add Evaluation to begin the process from adding an evaluation for your patient. The Due Date, by default, is 14 days in the future, but you can change this date to anything you desire simply by clicking into the date field and selecting a new date. Choose the practitioner that will be assigned to the patient. Add additional evaluation notes that will be added to the email template (you can preview your changes as well).
Patients that are not on the portal will receive the PDF copy of the survey, which they will complete manually and return to you via email, fax, or in person. Patients that ARE in the portal will receive an email instructing them to complete the survey online.
Note about Survey Date: Setting the date here is used primarily as an engine for future statuses, reminders, etc. If you end up evaluating your patient prior to this date, or after this date, once you place the patient into protocol, the evaluation date will reset to the date the patient was placed into protocol, which in most cases is the date of the actual evaluation.
Need Survey – This status only exists for new patients that do not have existing evaluations. It indicates that a survey needs to be generated for the patient.
Pending – When an evaluation is create for a future date, and that future date is more than the days allotted in the setting, Send initial Evaluation Invite “X” days before Evaluation Due Date. For example, if the setting is set to its default of 14 days, and evaluation due date is 15 days or more in the future, the status given will be Pending. It will remain pending until the due date reaches 14 days in the future, at which time the initial evaluation invite email will be sent and the status will change accordingly.
Need Reeval – Patient has not completed an evaluation in over 395 days.
Survey Sent – Status only for portal patients indicating that the survey was sent and the patient should be completing online.
Evaluation Due – Status indicating that the evaluation is due. Driven by the Evaluation Due Status in Setup (default is 2 days before evaluation due date), this status will change from Survey Sent or InProgress to Evaluation Due.
Need Review – Status indicating that the survey has been submitted via the patient portal OR that the Mark for Review button was clicked on the Survey Tab in the practitioner portal, and the doctor now needs to review it.
Reviewed – Status only for portal patients indicating that the doctor has reviewed what the patient has submitted, but has not yet completed a report of findings with the patient and started the protocol
In Progress – Survey is currently in progress. Either the patient still has to return the survey or the office has the survey and has not entered the data in manually.
In Protocol – Report of findings has been complete, protocol has been determined/approved, and the protocol has begun. In Protocol status will automatically change to Protocol Ending when the patients evaluation protocol is nearing its end.
Protocol Ending – The In Protocol status for a patient evaluation will automatically change to Protocol Ending 10 days prior to the end of Days Supply. For example, if the days supply for a patient evaluation is set for the default 60 days, the evaluation status will be In Protocol from day 1 through day 50, then change to Protocol Ending from day 51 through day 60.
When a protocol changes to Protocol Ending, you should consider 1) getting more product to your patient if you want him/her to continue on the current protocol, or 2) have your patient complete a new survey evaluation so that you can get a new baseline for patient progress.
Closed – This status is only viewable within the evaluation details screen, when a patient evaluation has been closed manually or when the protocol has expired.
Home – All patients are shown
Open Chats – Shows only patients that have sent a chat to the practitioner and the chat has not yet been viewed by the practitioner.
Leads – Shows all patient that were created via the Patient Generator, regardless of status.
Open Surveys – Shows all patients with Survey Sent, Survey Due, Need Review, Reviewed, In Progress or In Protocol status.
Follow-Up – By default shows a list of patients based on the “Follow Up” settings in the Setup screen. Shows all statuses except completed. Can be fine-tuned using the date range filter option.
Protocols Ending – Shows all patients with Protocol Ending status that fit this scenario: Days Supply minus 10 days.
Patient Needs – Shows patients with Need Survey or Need Reeval status.
Doctors Focus – Shows patients that require the doctors attention. Statuses Need Review and Reviewed
Recent – Shows the last patients viewed, in descending order, regardless of status
Name – Last Name, First Name, sorted by Last Name. Icons will display next to patient name if they are vegetarian, gluten free, and when they are registered on the portal.
Evaluation Status – the most recent status of the patient such as In Progress, Survey Sent, Survey Due, In Protocol. If the most recent status of an evaluation is Closed, the Status column will be blank unless the last evaluation was more than 395 days in the past (it will show Need ReEval in this case). If it is a new patient and an evaluation has never been created, this status will show Need Survey.
Evaluation Date – Date of the most current evaluation unless the most recent evaluation is In Protocol, Protocol Ending, or Closed. In each of these cases, Add Evaluation will be displayed.
In Protocol – If a patient has an evaluation that is In Protocol or Protocol Ending, and icon will display here as a visual notifier.
Phone – Phone number (if one exists in the patient details) can be clicked to bring up your computer systems default phone dialer (if one exists).
Email – Email address (if one exists in the patient details) can be clicked to bring up a blank email in your computer systems default window program such as Outlook.
Actions – From the actions menu, you can view patient details, edit patient details, invite the patient to the patient portal (if subscribed to a Plus service), deactivate or reactivate the patient.
On the Patient list, click the three dots under the Actions column for the desired patient, then click Invite Patient to Join Portal. Patient must have an email address in the system. Patient will receive a verification email after-which they will be directed to create a password. Username is always the email address.
On the Patient list, click the three dots under the Actions column for the desired patient, then click Deactivate. Patient will no longer show in your patient list unless you click Show Inactive, which will temporarily display deactivated patients in the patient list. Follow this same process to reactivate a Patient.
Patient Details Screen

The Patient Detail screen holds all the information about your patient as well as a history of their evaluations. When on the Patients list, click the patient’s name to get to the details screen.
- The Joined Date is when the patient was first created in Maestro.
- Edit allows you to modify the patient’s demographic information as well as tax and discounts.
- Login to Patient Portal – if the patient is registered on the Patient Portal, you will see a link to log into the patient’s portal. This is useful for troubleshooting with your patient and/or guided instruction if your patient needs help.
- +Evaluation button is provided here as well as the Home and Patient List screens. Functionality is only available if there are no open evaluations currently for the patient.
- Evaluations Tab show a history of all evaluations done with this patient.
- Chat tab allows you to chat and view chats with your patient.
- Survey Forms allow you to send the PDF version of the survey to a patient, with options to add their name, shows groups headers, add practitioner name.
- Evaluation summary shows current evaluation status, evaluation date, length of protocol selected on the evaluation, and whether the patient is improving or declining from one evaluation to another, based on survey score.
- Evaluation notes entered for this patient on this evaluation.
- Survey/Blood/Results shows how many survey questions were answered, blood values entered, and supplements selected for this evaluation.
- Quick reporting tool allows you to print, email and/or download one or more reports related to the given evaluation. More Info Here
Setup Screens
This screen is only manageable by the main administrator, in almost all cases, the person subscribing to Maestro. Always thoroughly complete this screen as many fields are visible to the patient.
Practitioner Information
On the left side is the main administrator information: Title (Dr. Mr. Mrs. Ms. etc.), first name, last name, and suffix (MD, DC, AP, ND, Jr, etc.). You can also upload a picture of yourself so that patient can visually recognize you in the patient portal. The email address on this side is the username and cannot be changed.
Organizational Information
Practice Name, Practice Slogan (if applicable), Address, Phone. These elements should be up-to-date at all times as they will print on patient reports, emails and be visible in the patient portal.
GENERAL TAB
Attach Survey Form to Evaluation Email – The survey form selected here will be attached to any evaluation invite email where the patient is not going to be completing the survey online.
- 212 Q (English) and 212 Q (Spanish) are the standard survey form.
- 212 Q Extended (English) is the standard survey form with additional questions that are not housed or maintained in Maestro. This form is being tracked for usage and may be retired at some point in the future.
Admin-Added Practitioners Can View All Patients – If you’ve invited and granted access to other practitioner within your practice, by default they will only be able to see patients that are assigned to them. Checking Practitioners Can View All Patients will grant access for other practitioners to see all patients, regardless of assignment.
SUPPLEMENT VENDOR SELECTION
Maestro will provide supplement recommendations for up to three brand vendors (3 maximum, 1 minimum). Place a check mark next to the brand vendors for which you wish to see supplement recommendations. Drag your selected brand vendors to change the order in which they will display on the Supplement Recommender screen. The brand vendor in the top position will be your pseudo default. Note that not all brand vendors support blood chemistry and will not have the blood drop icon display next to their name. Also note that Maestro has its own built-in learning management system, Maestro AI, and we utilize this at times to assist with creation and validation of supplement recommendations as they pertain to specific system survey and blood marker responses and values. Maestro AI indicates supplement suggestions that may not yet have been fully reviewed by our practitioner advisory team. Practitioners should verify these selections for relevance and clinical appropriateness before use.
Note that changing these setting will not affect existing evaluations, only evaluations created after the setting is saved.
Supplements Recommended – Max # of Survey / Max # of Blood – When on the results screen, our algorithm will generate supplement recommendations in the Supplement Recommender showing a maximum number of supplements (per brand vendor) based on this setting. We limit the supplement recommendations per brand vendor to 8.
Automatically add supplements to the patient schedule – When on the results screen, our algorithm will generate supplement recommendations in the Supplement Recommender and automatically add these supplements (survey and/or blood) to the Patient Supplement Schedule. It will do this only for your top list brand vendors, the pseudo default.
REMINDERS TAB
Evaluation Reminders Schedule – Here you can schedule one before and/or one after reminder for all your patient evaluations. Send reminder email “X” day(s) before and Send reminder email “X” day(s) after. Based on the evaluation due date, the system will automatically send a reminder “X” days before the date and/or “X” days after the date, reminding your patient to complete the survey evaluation.
Protocol Ending Reminders – When a patients status changes from In Protocol to Protocol Ending (10 days before the end of their supply), you can elect for yourself and/or your patient, to receive a protocol ending email. For you, this is another queue to either replenish your patient supplements or to reevaluate your patient. For your patient, this is a queue to call your office to get more product.
Next Evaluation Notifications – To prevent “too early” delivery of the initial evaluation invite email, evaluations created for future dates will be delayed and assigned a pending status. The Send Initial Evaluation Invite Email is defaulted to 14 days before the evaluation due date, meaning, if the evaluation due date when creating and evaluation is 14 days or sooner, the system will automatically send the evaluation invite email, If the evaluation due date is 15 days or more in the future, the system will assign the evaluation a pending status and queue the invite email under 14 days out, then send the invite. In most cases, this default is sufficient.
STATUSES
Follow Up (Home Screen and Patient List Filter) – This is a filter to limit the scope of the Follow Up patients so that you are being notified for a smaller group that need attention sooner. This filter narrows the scope of the Home Screen Follow-Up window as well as the Follow Up filter on the Patients List.
Evaluation Due Status – When you create an evaluation for a patient for a specific date, the status will initially show as Survey Sent. This setting, by default, will automatically change the Survey Sent status to Evaluation Due. This is your indication that the patient may need to be contacted to complete the evaluation.
In Protocol Status Buffer – This is an important feature. We know that not all practices maintain product on hand. We have virtual practices, practices that carry only some essential products, and a growing number of practices that carry no product at all, instead using options such as drop ship, Fullscript, etc. In these cases, we know that there likely will be a window of time between when you start the patient’s protocol in Maestro and when the patient actually has their product to begin using. This setting solves for that gap. 10 days is generally an ideal setting as it allows for 3-5 days shipping as well, potentially a weekend in between order and delivery, and time for the patient to get ready to start using.
EVALUATIONS
Days Supply (Default Length of Protocol) – Determines the length of a typical protocol. Our bottle optimizer utilizes the product dosing, quantity, and days’ supply to determine the most efficient amount of product for the patient to purchase. This is just a default derived over time to be the standard for protocol length but can be changed on the results screen for individual evaluations. For example, if at the time of report of findings, you determine that you only want a specific patient to be on a protocol for 30 days, you can change it on the results screen without changing this global default. Note that changing the Day Supply will not affect existing evaluations, only evaluations created after the setting is saved.
Open Evaluation Immediately After Creation – With this option set, evaluations that are created will immediately open so you can begin working faster.
Display Conclude Evaluation Confirmation Popup – When you are concluding an evaluation, you can set this to off (unchecked) so that the evaluation will immediately change to an In Protocol status. With this setting on (checked), you will be presented with an additional screen to allow you to Start the Protocol or End the Evaluation.
Automatically Create New Evaluation X Days from Last Evaluation – With this set, and a number value entered, when an evaluation changes to Closed status and there are no other open evaluations, the system will automatically create a new evaluation “X” days from the prior closed date.
REPORTS
Print supplement descriptions – This is an option to include the supplement descriptions on the supplement schedule.
Print doctor notes below grid – Generally, doctors notes are added on the report after the supplement descriptions. This option allows for the doctor notes to be added before the supplement descriptions, just under the supplement schedule grid.
Remove authorized signature – This option makes the supplement schedule more in line with a script pad allowing an authorized clinician a place to sign the schedule for validity. If you are not a doctor or this does not apply to you, this setting should be checked.
INVOICES
Default Invoice Type – Depending on how you generally get product to your patients, this setting is a default for the type of invoice that is most appropriate. Standard List Price invoices will show the actual MSRP of the product. Drop Ship invoices will show a modified pricing based on the price enumerations percentage. Note that Patient Direct, inSITE and Fullscript invoices do not show pricing as individual practices and patients may have pricing customized specifically for them. Note that changing the Default Invoice Method will not affect existing evaluations, only evaluations created after the setting is saved.
Supplement Sales Tax % – This setting will affect all patients unless a specific patient has a separate supplement sales tax entered in their patient details. This setting applies sales tax to all supplement products.
Non-Supplement Sales Tax % – This setting will affect all patients unless a specific patient has a separate non-supplement sales tax entered in their patient details. This setting applies sales tax to all non-supplement products.
Supplement Discount/Increase % – This setting will affect all patients unless a specific patient has a separate Supplement Discount/Increase % entered in their patient details. This setting applies a percentage increase or percentage decrease to all supplement products. Does not affect shipping or supplements that are not on a Standard List Price invoice.
Drop Ship – If you use this method of supplement delivery to your patients, enter your SP account number, the last four digits of the CC that SP has on file. You will then be able to email drop ship orders directly to SP from within the invoice screen. If you desire to charge tax on the drop ship shipping fee (if minimum to ship free is not met), place a check here. Shipping is taxed at the supplement sales tax %.
Patient Direct – If you use this method of supplement delivery to your patients, enter your Patient Direct Number. When utilized, Patient Direct invoices will have the following message for your patient added to the invoice and WILL NOT show pricing: To place an order for the product below, please visit https://my.standardprocess.com/Patient-Direct and use our Patient Direct Code: {PD code entered here}. If you are not yet registered to order via Patient Direct, you may do so on that page. Once registered, we will have to approve you before placing an order.
inSITE – If you use this method of supplement delivery to your patients, enter your inSITE web address. When utilized, Patient Direct invoices will have the following message for your patient added to the invoice and WILL NOT show pricing: To place an order for the product below, please visit {inSITE URL entered here}. If you encounter any issues ordering a product, please contact us.
Fullscript – No user settings, just informational. When utilized, Fullscript invoices will have the following message for your patient added to the invoice and WILL NOT show pricing: To place an order for the product below, please visit https://us.fullscript.com/login to login to your Fullscript Account. If you encounter any issues ordering a product, please contact us.
The subscription screen tells you what your current subscription is and allow you to see your payment history, download subscription receipts, update your plan to a different subscription level, update payment method or billing information, or cancel your subscription. Be cautious when changing your subscription. If you are on a legacy plan and change to a non-legacy plan, you will not be able to return. With cancellations, there are no refunds. You may cancel but you will have access to the system until the end of the paid subscription period.
From this screen you can invite additional practitioners that reside under your practice name. Adding practitioners outside of your practice is prohibited and your account will be closed.
Inviting Practitioner – Name and email address is needed to invite. Once invited, the added practitioner will received an email verification and then need to create his or her own password.
Viewing Patients – The main practitioner or administrator can see all patients always. Additional practitioners can only see patients that are assigned to them unless the main practitioner has granted access to all patients (See Setup > Settings > Practitioners Can View All Patients
Deactivate Practitioner – In the event a practitioner is no longer in your practice, you can deactivate the practitioner. Upon doing so, you will need to reassign all patients that were assigned to the exiting practitioner to a new practitioner.
Reactivate Practitioner – Deactivated practitioners will show as inactive. With just a click of a button, you can reactivate them any time. Please note that reactivating will not reassign former patients to the practitioner.
Reset Password – Although rare, in the event the invited practitioner did not receive the initial email verification, this can be sent again.
List of all system installed and user-defined supplements. From actions, you can edit a supplement or discontinue a user-defined supplement.
Adding a Protocol – Enter the protocol name and protocol note. For existing user-defined protocols, you can mark them as inactive here as well.
Adding a Product – First you add the protocol, then assign supplement to the protocol (note that any user-defined supplements need to be created first). click ad supplement, search for one or more supplements to add, give each their own custom dosages, and protocol notes that will be visible in reports.
List of all system installed and user-defined supplements. From actions, you can edit a supplement or discontinue a user-defined supplement.
Adding a Supplement – Enter the supplement name, brand, # of days per week the supplement should be taken (generally 7), # per day and at what interval, if it is gluten free or vegetarian, indicated in blood pressure high/low, quantity type (tablet, capsule, etc.), and descriptions and notes that will print on the various reports if you select “Print My Short Descriptions on Reports.”
Adding a Product – First you add the supplement, such as Tap Water. Then you need to tell the system the different products (skus) of Tap Water, such as Sku 123 16Oz and Sku 456 32 Oz. You can add as many products as necessary. Product number, quantity (typically the number of tablets for example in the bottle), doses per bottle (if a dosage is two tablets per day and the quantity is 180 tablets in the bottle, the doses per bottle will be 180 divided by 2, or 90) and the list price. Cost is not needed, nor is override price for a user-defined product. You can override the price of any system installed supplement.
Default Supplement – A default supplement is one that, by default, will be added to the protocol results. Default supplements are added to your protocol in addition to the supplement recommendations generated by the survey.
To designate a supplement as default, find the supplement on the Supplements tab in Setup, then click the three dots on the far right and select Edit. Toggle on the Default Supplement button and then click save. Note that designating a supplement as default will not affect existing evaluations, only evaluations created after the supplement is designated.
This option will only show if you are subscribed to a Plus service plan AND have purchased the Patient Generator Add-On. Download the displayed QR code or use the provided URL within your website or social advertising. You can also use the URL and create your own customized QR using such website as QR Monkey.
This chat option allows you to chat directly with Maestro Support for non-urgent issues, questions, etc.
Understanding the Evaluation Screens
Survey Screen

The Survey Input screen is quite simple, providing for three ways of survey response input. Granted, if your patient completes the survey online, their reponses will automatically populate here. However, if you have to manually enter the responses, keep reading.
- The Next and Previous buttons take you from one survey section to the next. You can also click directly on any of the numbers to jump directly to a section.
- Use your mouse, you can select the appropriate answer to each question. If you answer a question by mistake, simply return the value back to None.
- Quick Entry 1 is a quicker way to enter responses. For this method, you simply enter the question number and the response value, then click enter on your keyboard. Continue in this fashion until you have entered all the survey responses. There is no need to enter 0 (None) responses.
- Quick Entry 2 is the faster and recommended method if entering responses. Because the survey is linear, you simply set the answer number to 1 and scan through the survey for 1 responses. For each response, just enter the question number and click enter on your keyboard. Then set the answer number to 2, and repeat. Then 3, and repeat.
Functional Blood Chemistry Screen

- The search box allow you to type in a marker name and then click enter on your keyboard. The marker, if found, will be isolated on your screen and ready for you to view and/or enter a lab value.
- The groups dropdown allots you the ability to sort the markers in three ways:
- By Group (Chemistries, Lipids, Thyroid, Immunoassay, Complete Blood Count/Platelet/Diff, and Other), which is the default
- Out of Range, which will parse the markers to only show those that are above or below Optimal range, or above or below Lab range.
- By name, which simply places the markers in alphabetical order (A-Z).
- This column is where you will enter the lab value from the patient lab report. Using the keypad, enter the number and then click enter or TAB on your keyboard. To remove a value, double click the value box and click the X.
- Values that are Out of Optimal Range but within the Lab Range will be displayed in yellow with and up or down arrow depending on if the value is above Optimal or below Optimal.
- Values that are Out of Lab Range, including those that may also be Out of Optimal Range, will be displayed in red with and up or down arrow depending on if the value is above Lab or below Lab.
- Select the Blood Draw date from the patient labwork.
- Check if the blood draw was fasting or not, based on the patient labwork.
Albumin, Serum
Albumin/Globulin Ratio
Alkaline Phosphatase
ALT (SGPT) (Alanine Aminotransferase)
Anion Gap
AST (SGOT) (Aspartate aminotransferase)
Basophils (Basos)
Basophils (Basos) (Absolute)
Bilirubin Total
BUN (Blood Urea Nitrogen)
BUN/Creatinine Ratio
Calcitriol (1, 25 di-OH Vit D)
Calcium, Serum
Calcium/Phosphorus Ratio
Carbon Dioxide, Total
Chloride, Serum
Cholesterol, Total
C-Peptide
C-Reactive Protein (CRP)
Creatinine, Serum
eGFR (estimated Glomerular Filtration Rate)
Eosinophils (Eos)
Eosinophils (Eos) (Absolute)
Ferritin, Serum
Fibrinogen Activity
Free Thyroxine Index
GGT (Gamma-Glutamyl Transferase)
Globulin, Total
Glucose, Serum
HDL Cholesterol
Hematocrit
Hemoglobin
Hemoglobin A1c
Homocyst(e)ine, Plasma
Immature Granulocytes
Immature Granulocytes (Absolute)
Insulin
Iron Saturation
Iron, Serum
LDH (Lactate dehydrogenase)
LDL Cholesterol
LDL/HDL Ratio
Lymphs
Lymphs (Absolute)
Magnesium, Serum
MCH (Mean Corpuscular Hemoglobin)
MCHC (Mean Corpuscular Hemoglobin Concentration)
MCV (Mean Corpuscular Volume)
Methylmalonic Acid
Monocytes
Monocytes (Absolute)
Neutrophils
Neutrophils (Absolute)
Phosphorus, Serum
Platelets
Potassium, Serum
Prolactin
Protein, Total, Serum
PSA (Prostate Specific Antigen)
RBC (Red Blood Cells)
RDW (Random Distribution of RBC Weight)
Reticulocyte Count
Reverse T3
Sedimentation Rate – Westergren
Sodium, Serum
T. Chol/HDL Ratio
T3 Uptake
T4, Free (Direct)
Thyroglobulin, Antibody (TGB Ab)
Thyroid Peroxidase (TPO) Ab
Thyroxine (T4)
TIBC (Iron Binding Capacity)
Triglycerides
Triiodothyronine (T3)
Triiodothyronine (T3), Free, Serum
TSH (Thyroid-Stimulating Hormone)
UIBC (Unsaturated Iron Binding Capacity)
Uric Acid, Serum
Vitamin B12
Vitamin D, 25-Hydroxy
VLDL Cholesterol
WBC (White Blood Cells)
Results Screen

- This section is broken out into specific sections to make viewing supplement recommendations easier. The top section, User Added, will only show if you manually add a supplement or protocol to the patient supplement schedule. The Supplement Recommender is where Maestro’s internal analysis engine places recommended supplements based on the patient survey responses and/or blood chemistry values input. Survey and Blood recommendations are grouped by brand vendor and will only show if survey responses and/or blood values are entered in the evaluation.
- Supplement attribute icons: Hover over the “i” with your mouse cursor to see the product description. Click the “i” to get a pop-up showing the clinical reference commentary, indications and alternate dosing. Additional icons (optional) will display if the product is vegetarian, gluten free, or has a caution/indication.
- The Total Score column shows Maestro’s proprietary supplement scoring. Supplements on the Supplement Recommender are always in order of importance, in descending order.
- To add a supplement from the Supplement Recommender to your Patient Supplement Schedule, simply click the add button, or + Select All. To remove a supplement from your Patient Supplement Schedule, simply unselect the checked supplement, or – Deselect All. You can add any one or more supplements from any of the brand vendors showing. You may see the same supplement being recommended within the survey section as well as within the blood section. The system prevents duplicate supplements from being added to the Patient Supplement Schedule, so when a same supplement is selected, you will see that it highlighted in both areas.
- Changing the $ dropdown will adjust the pricing for each product based on list price, drop ship, etc. The is necessary so that you are telling your patient a more accurate cost of the protocol you are building. Clicking the bottle dropdown will allow you to change the length of this current evaluation protocol. Bottle quantities and pricing will automatically change based on how long or short you want the patient to be on the protocol. Under Setup, you can change the default Pricing option as well as the default length of protocol. Under the three dots are two options. Reset Grid will reset the screen to its original status prior to any changes being made. Delete Evaluation will delete the evaluation complete. Be careful when using either of these last two options!
- +Supplement allow you to search for and add any additional supplements. These are not limited to preinstalled system supplements, but also to any supplements and/or supplement brands you may have manually added. Under the + Protocol dropdown are two options. +Previous Protocol allows you to add a protocol for which the patient was on in the past. You can search by date, preview the protocol, then add it to your patient schedule. +Protocol allows you to search for and add any protocols available from the clinical reference guide as well as any protocols you may have manually added via Setup.
- Daily, Weekly, Monthly breaks down the full cost of the protocol as additional talking points with your patient. A low daily price might be a good counter or justification to eliminating one purchased coffee per day.
- Note to Practitioner are system generated notes such as added protocols, cautions for similar supplements, cautions for supplements that might conflict with the vegetarian or gluten-free patient, blood markers that are out of range and what supplements should be considered, etc. These are system generated, will only show on the reports for clinician, and cannot be modified. You can click the eyeball to preview, print and/or download a simple text version of these notes. Notes to Patient are anything you might want to provide to your patient such as exercise at least 20 minutes a day. These notes will show on the patient reports, so be sure to word things in a manner that is appropriate for your patient. Evaluation Notes are for you, the practitioner, and will only show on reports for the clinician. These are clinical observations about your patient that they will not see. Five Main Complaints from the survey. Very important to review as supplement recommendations are not generated based on patient complaints.
- This portion of the grid shows the dosing (how many per day and at what times), supplement attribute icons, total Days Supply (which is the actual number of days the bottles will last your patient: always equal to or more than the length of protocol), number of bottles of a given supplement needed to cover the days’ supply, total cost of the given supplement.
- Important to know: You can change dosing in two ways. Option 1: click directly in a dosing field for a product (i.e., Upon Rising, Breakfast, etc.) and you’ll be able to choose quantities 0-5. With this option, you will have to refresh your browser for your change to be reflected in the bottle optimizer count. Option 2: Click the supplement name after which you can modify the dosing using parts (i.e., 0.25, 0.5, etc.) up to an infinite number. Once you click save and are back on the results tab, the program will automatically optimize the number of bottles needed. You can also add in supplement specific patient notes such as take with water, take for first 2 weeks then pause for a week, etc. These notes will be printed on the Supplement Schedule report.
- You may click the down arrow to see what size bottles have been added and/or to adjust the number of bottles and sizes you want to sell. Note that the number of bottles add is our Bottle Optimizer doing the calculations for you. # of supplements taken per day multiplied by length of protocol. The Optimizer will then determine how many bottles are required and when a supplement comes in different sizes, will determine best value.
- This button has several different faces depending on where you are in the evaluation process.
- Approve w/o Submission – When a patient is completing a survey online but has not yet clicked Submit in the Patient Portal, you as the practitioner can circumvent the process and approve the survey without the patient’s submission. This can be helpful if the patient forgot to click submit and cannot get back to it timely, tech issues, etc.
- Approve Survey – When a patient completes the survey in the Patient Portal, it is your time to review the survey for completeness. Survey responses are neither wrong nor right, so you want to review to make sure they aren’t any glaring omissions such as skipped sections, no answers at all, etc. You will also see the Approve Survey button if you previously approved the survey without the patient submission.
- Conclude Evaluation – Once you’ve consulted with your patient and have agreed to a protocol, pricing, etc., click the Conclude Evaluation button. You will be presented with a Start Protocol / End Evaluation pop-up with several additional options:
- Start Protocol – The system will track the protocol, provide reminders when the protocol is nearing its end so that you can reevaluate your patient in a timely manner, and/or supply them with addition product. The evaluation status will change to In Protocol. An In Protocol status represents that your patient is now utilizing the protocol you’ve designed for them, and the evaluation can no longer be changed.
- End Evaluation – Protocol will not be tracked, reminders not sent. The evaluation status will change to Closed and the evaluation can no longer be changed.
- With both options above, you can schedule the next evaluation for the patient by placing a check in the Add Next Evaluation Date box, selecting an appropriate date, and marking whether the next evaluation will be a Survey evaluation or Non-Survey evaluation.
- End Protocol Early / Adjust Protocol – You may at some point need to end a protocol for a patient or want to adjust the protocol a bit for whatever reason. If the evaluation is still In Protocol, you can click here and follow the onscreen prompts.
- End Protocol will immediately move the evaluation to a Closed status and any notifications and reminders will be deactivated.
- Adjust Protocol will immediately move the evaluation to a Closed status but will also immediately create a new evaluation, copying over the entire supplement schedule so that you can now tweak it as desired and rebegin the protocol.
- Note about the evaluation date: Once you’ve consulted with the patient, whether that be on the originally set evaluation date, prior to the date, or past the date, when you click on Begin Protocol, the date will change to the date of which you placed the evaluation into protocol, thus capturing a more accurate date that you consulted with the patient.
Reports Screen (within an Evaluation)

This report screen allows you to generate a number of reports and store them in different ways.
- Select an individual report by clicking on the name (do not place a check in the box) and the report will display in the previewer. Do this again and again to preview any report you desire. If you place a check in any report box, the previewer will display the first report checked, so this is not desireable when previewing report. The generator cannot preview multiple reports at once.
- While reviewing a report, you can download that report to your device using the download button.
- While reviewing a report, you can print that report to using the print button. (Note that you cannot print multiple reports at once).
- While reviewing a report, you can email that report to your patient using the email button. Emails are sent to the email address found in the patient profile and a carbon copy is also sent to the practitioner.
- For all Patient Reports, you can preview, download, print and email is either English or Spanish.
You can also select, by checking the box next to the report name, multiple reports and then click the download or email buttons. When two or more reports are emailed or downloaded, they are compressed into a ZIP file for more efficient processing. Zip is an industry standard and preferred method for sending multiple files via email as the email size is smaller and greater chance of deliver.
You cannot print multiple reports at one time. Reports must be printed individually.
Reports Screen (within Patient Details Screen)

This report screen is similar to the report screen found within an evaluation with the exception that it does not contain the previewer. It allows you to generate a number of reports and store them in different ways.
- Enter the Patient Details screen by clicking on the patient name from the Patients List. The report options pop-up will display.
- Choose the language desired for the reports: English or Spanish.
- Select one or more reports by placing a check in the box next to the report name.
- Click the download button to download selected reports to your device.
- Click the print button to print a selected report. (Note that you cannot print multiple reports at once).
- Click the email button to email selected reports to the email address entered. The default email address shown is the email address from the patient profile, but here you can send to any email address desired.
When two or more reports are emailed or downloaded, they are compressed into a ZIP file for more efficient processing. Zip is an industry standard and preferred method for sending multiple files via email as the email size is smaller and greater chance of deliver.
You cannot print multiple reports at one time. Reports must be printed individually.
Invoices Screen

The Invoice generator allow you to create a number of different invoice types depending on how you maintain inventory of supplements. You are able to create multiple invoices for a given evalaution as well, for those times that the supplements your are recommending will need to be ordered in different ways.
Please note: Maestro does not facilitate the ordering of- or delivery of- supplement for or to your patient. Maestro does not have a point of sale (POS) to charge a patient and/or receive payment.
It is important to note that although you can create an invoice at any time during an evaluation, it is not recommended to create one until you’ve consulted with you patient, agreed on the protocol, and clicked the Begin Protocol button on the Results tab.
- Show Price As – Select this object first to show the pricing based on how you’d like to get your supplements to your patient.
- List Price – Pricing is shown based on manufacturer Suggested List Price (SLP). If you patient has a Supplement Discount/Increase % set, or you have one set in the global settings, that discount or increase will be reflected in the pricing. Furthermore, if you have an override price for a given supplement (manually set under Setup > Supplements), that price will also be reflected here.
- Drop Ship – This pricing is based on the drop ship option from Standard Process, and reflects SLP plus 10%. Price overrides are ignored for this pricing option as are Supplement Discount/Increase % (patient or global)
- Patient Direct – This pricing is based on the Patient Direct option from Standard Process, and reflects SLP plus 10%. Price overrides are ignored for this pricing option as are Supplement Discount/Increase % (patient or global)
- inSITE/API – This pricing is based on the inSITE/API option from Standard Process, and reflects SLP plus 10%. Price overrides are ignored for this pricing option as are Supplement Discount/Increase % (patient or global)
- Fullscript – This pricing is based on the Fullscript option from Standard Process, and reflects SLP plus 10%. Price overrides are ignored for this pricing option as are Supplement Discount/Increase % (patient or global)
- Show on Invoice – use these checkboxes to select which supplements you want to show on the next generated invoice.
- Genearte – Once you’ve chosen the Show Price As, have selected the appropriate supplements using the Show on Invoice checkboxes, and have added any non-supplement products using the +Products button, click Generate to create the invoice. From the invoice pop-up, you can email, print or download the invoice for your records or your patient.
- The +Product button allow you to add non-supplement products to your invoice such as office/visit fees, lab fees, tangible products such as shaker bottles, etc. Non-supplement products will only show on an SLP or Drop Ship invoice.
- The Options and Fees section will show shipping fees (if total SLP does not meet a minimum for Drop Ship, Patient Direct, etc.), and any taxes applied (dependent on taxable “yes” supplements or products).
- The Invoices created will be stored for historical purposes.
Specific details about the different Invoice types.
- List Price invoices show patient pricing in addition to product SKU, product NAME, Quantity. Supplement products are clearly seperated from non-supplement products. Be sure to collect payment from your patient when utilizing this Invoice type.
- Drop Ship invoices show patient pricing in addition to product SKU, product NAME, Quantity. Supplement products are clearly seperated from non-supplement products. Be sure to collect payment from your patient when utilizing this Invoice type. Furthermore, Maestro has an option for you to send your Drop Ship orders directly to Standard Process Customer Service for processing via the Email to Standard Process button. The order form sent will include the Patient Information (where SP will send the product), your account information (this needs to be setup under Settings), and the products that are being ordered (non-supplement products are not fulfillable via Standard Process and are not included on the order form).
- Patient Direct, inSITE and Fullscript invoices DO NOT show patient pricing as patient pricing can be different from practice to practice and patient to patient at each of these endpoints. Instead, these invoices only show product SKU, product NAME, and Quantity to purchase. Your patient will pay for any product at the endpoint choses, so there is no need for you to collect payment from your patient when utilizing these Invoice types.
- Patient Direct invoices show the Patient Direct URL as well as the Practitioner Patient Direct Code, in addition to the following note: “To place an order for the product below, please visit https://my.standardprocess.com/Patient-Direct and use our Patient Direct Code: A12345. If you are not yet registered to order via Patient Direct, you may do so on that page. Once registered, we will have to approve you before placing an order.” Your patient will pay for any product at the endpoint choses, so there is no need for you to collect payment from your patient when utilizing these Invoice types.
- inSITE invoices show YOUR inSITE or API URL, in addition to the following note: “To place an order for the product below, please visit https://maestro.insite.com. If you encounter any issues ordering a product, please contact us.” Your patient will pay for any product at the endpoint choses, so there is no need for you to collect payment from your patient when utilizing these Invoice types.
- Fullscript invoices show the Fullscript URL, in addition to the following note: “To place an order for the product below, please visit https://us.fullscript.com/login to login to your Fullscript Account. If you encounter any issues ordering a product, please contact us.” Your patient will pay for any product at the endpoint choses, so there is no need for you to collect payment from your patient when utilizing these Invoice types.
Sample Invoices


Common Tasks
Adding a New Patient

Adding a new patient to the system is done by clicking the + Add Patient button on the Home screen or on the Patients list (button is located in the upper right side). The Add Patient popup consists of three separate screens: Personal Details, Contact and Price Details, Invites.
Personal Details
First Name, Last Name, Assign to Practitioner and Gender are the only fields that are required to create a new patient in Maestro. However, if you intend to email your patient through the system, an email is needed. Height, Weight, and Birthdate are for informational purposes only. Designating if your patient is vegetarian or gluten free is also recommended as it will activate alerts for supplements that may not conform to your patients’ dietary needs.
***NOTE – Email is a patient unique identifier in the system and cannot be shared across multiple patients.
Contact and Price Details
Phone number and address will print on invoices and are required when using the drop ship email function. Designating if your patient is Spanish speaking tells the system to send the Spanish version of the survey form.
Use Supplement Sales Tax %, Use Non-Supplement Sales Tax % and Supplement Discount/Increase % are all settings that are specific to the patient. Note that these settings are also available in the Global Setup (which affect all patients), however, any values entered individually for a patient will override those Global settings.
Set the sales taxes if you are required to charge this patient sales tax that is different than what you charge other patients. There are many rules and regulations as to when you do or do not need to charge sales tax. Please consult your accounting professional. The Supplement Discount/Increase % can be positive or negative and is used if you want to extend a discount to the patient for supplements you sell (conversely, you can increase the supplement pricing as well). Note that this discounting or increasing will only affect the standard list price of supplements but does not change the pricing for any other delivery method.
Invites
The first option shown is the Invite to the Portal (only applicable for subscribers of a “Plus” subscription service). If you intend for this patient to complete surveys online in the Patient Portal, leave this option checked. Your patient will receive a Patient Portal invitation via email which includes a link for them to create a password for portal access.
The second option shown are the Evaluation Types.
- None – If you are adding this patient to the system but do not yet want to create an evaluation (you will be evaluating the patient sometime in the future), leave this option set to None.
- Survey Evaluation – Check this option if you intend to evaluate your patient via the Systems Survey. Your patient will receive an email with instructions on how to complete the survey. If this option is checked in addition to the Invite to Patient Portal, your patient will receive only one email instructing them to create a password and complete the survey. If this option is check and the Invite to Patient Portal is uncheck, or you do not subscribe to a “Plus” subscription service, your patient will receive an email with the PDF survey form.
- Non-Survey Evaluation – Check this option if you intend to evaluate your patient using non-survey methods such as Heart Sound Recorder, Nutrition Response Testing, or if you just want to build a custom protocol. No patient emails are sent with this option.
Adding a New Evaluation

Adding a new evaluation can be done by clicking +Evaluation on the Patient List or by clicking on the patient name from the Patient List (this takes you to the Patient Detail screen) and clicking +Evaluation.
The first options shown are the Evaluation Types, and you’ll need to choose one.
- Survey Evaluation – Check this option when you want your patient to complete the Systems Survey. If your patient is not registered in the Patient Portal, they will receive an email with instructions to complete the survey by downloading and printing the attached PDF. If your patient is registered on the portal, they will receive an email instructed them to log into the Patient Portal and complete the Systems Survey. If this option is checked in addition to the Invite to Patient Portal, your patient will receive only one email instructing them to create a password and complete the survey. If this option is check and the Invite to Patient Portal is uncheck, or you do not subscribe to a “Plus” subscription service, your patient will receive an email with the PDF survey form. When this option is checked, you have a secondary option to supress the email being sent by selecting the Don’t Send Email button. It is recommended to select this secondary option if your patient is in-house and will complete the survey in your office, or anytime an email notification is not necessary.
- Non-Survey Evaluation – Check this option if you intend to evaluate your patient using non-survey methods such as Functional Blood Chemistry, Heart Sound Recorder, Nutrition Response Testing, or if you just want to build a custom protocol. No patient emails are sent with this option.
The next set of options are the evaluation date and practitioner assigned.
- Evaluation Date – By default, this date is set 14-days in the future, which generally is enough time for a patient to complete the survey, whether they are downloading and printing it, or completing online. This evaluation date shows on the emails as the “date” the practitioner would “like” to have the survey completed. It is an entirely soft date as when you later click the Begin Protocol button after you have consulted with your patient, teh date will change the the date of consult.
- Practitioner – If you have more than one practitioner in your office, you can assign this evaluation to the practitioner responsible for the patient.
The last option shown is the Invite to the Portal (only applicable for subscribers of a “Plus” subscription service). If you intend for this patient to complete surveys online in the Patient Portal, leave this option checked. Your patient will receive a Patient Portal invitation via email which includes a link for them to create a password for portal access. This option will no longer show if the patient is already registered on the portal.
Patient Portal
Getting to know the Patient Portal

Under Construction